


Dalam lab ini kita akan membuat initial setup untuk basic topology network automation dengan Ansible di GNS3. Diasumsikan Ansible sudah terinstal dan semua image sudah tersedia di GNS3.
Topologi Network Automation Lab
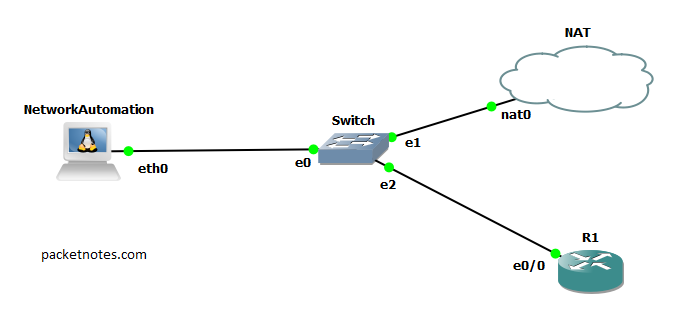
Configuration for Router R1
Setting IP Address di interface ethernet0/0
R1(config)#int eth0/0
R1(config-if)#no shut
R1(config-if)#ip add 192.168.122.100 255.255.255.0
R1(config-if)#end
Setting password, domain name dan line vty untuk keperluan setting SSH
conf t
R1(config)#username user password user123
R1(config)#username user privilege 15
R1(config)#ip domain-name staging.packetnotes.com
R1(config)#line vty 0 4
R1(config-line)#transport input all
R1(config-line)#login local
R1(config-line)#exit
Generate RSA key dan Modulus
R1(config)#crypto key generate rsa
The name for the keys will be: R1.staging.packetnotes.com
Choose the size of the key modulus in the range of 360 to 4096 for your
General Purpose Keys. Choosing a key modulus greater than 512 may take
a few minutes.

How many bits in the modulus [512]: 1024
% Generating 1024 bit RSA keys, keys will be non-exportable...
[OK] (elapsed time was 1 seconds)
Configuration for Network Automation Appliance
Setting network interface di linux network automation, uncomment lines di bagian DHCP.
root@NetworkAutomation:~# cat /etc/network/interfaces
#
# This is a sample network config uncomment lines to configure the network
#


# Static config for eth0
#auto eth0
#iface eth0 inet static
#       address 192.168.0.2
#       netmask 255.255.255.0
#       gateway 192.168.0.1
#       up echo nameserver 192.168.0.1 > /etc/resolv.conf

# DHCP config for eth0
 auto eth0
 iface eth0 inet dhcp
root@NetworkAutomation:~#
Karena tidak ada fitur restart services, stop appliance dan start kembali (restart manual) device Linux network automation.
Configure Hosts File
Masih di linux automation device, kita akan set host file untuk Ansible.
Directory /etc
root@NetworkAutomation:/etc# ls -al | grep hosts
-rwxr-xr-x 1 root root     178 May  9 10:16 hosts

root@NetworkAutomation:/etc# cat hosts
127.0.1.1       NetworkAutomation
127.0.0.1       localhost
::1     localhost ip6-localhost ip6-loopback
fe00::0 ip6-localnet
ff00::0 ip6-mcastprefix
ff02::1 ip6-allnodes
ff02::2 ip6-allrouters
Tambahkan ip R1 di file hosts yang di directory /etc/:
root@NetworkAutomation:/etc# cat hosts
127.0.1.1 NetworkAutomation
127.0.0.1 localhost
::1 localhost ip6-localhost ip6-loopback
fe00::0 ip6-localnet
ff00::0 ip6-mcastprefix
ff02::1 ip6-allnodes
ff02::2 ip6-allrouters

192.168.122.100 R1
Untuk mengecek apakah sudah ada konektifitas dan file host diatas sudah berfungsi, kita coba ping dari linux automation host ke R1
Dengan DNS
root@NetworkAutomation:~# ping R1
PING R1 (192.168.122.100) 56(84) bytes of data.
64 bytes from R1 (192.168.122.100): icmp_seq=1 ttl=255 time=3.51 ms
64 bytes from R1 (192.168.122.100): icmp_seq=2 ttl=255 time=1.97 ms
^C
--- R1 ping statistics ---
2 packets transmitted, 2 received, 0% packet loss, time 1005ms
rtt min/avg/max/mdev = 1.978/2.748/3.518/0.770 ms
Dengan IP Address
root@NetworkAutomation:/etc# ping 192.168.122.100
PING 192.168.122.100 (192.168.122.100) 56(84) bytes of data.
64 bytes from 192.168.122.100: icmp_seq=1 ttl=255 time=3.68 ms
64 bytes from 192.168.122.100: icmp_seq=2 ttl=255 time=1.30 ms
^C
--- 192.168.122.100 ping statistics ---
2 packets transmitted, 2 received, 0% packet loss, time 1002ms
rtt min/avg/max/mdev = 1.309/2.499/3.689/1.190 ms
root@NetworkAutomation:/etc#
Kemudian kita cek apakah ada host yang sudah terconfig di file host
root@NetworkAutomation:~# ansible --list-hosts all
 [WARNING]: provided hosts list is empty, only localhost is available. Note
that the implicit localhost does not match 'all'

  hosts (0):
root@NetworkAutomation:~#
Karena belum ada host yang ditambahkan di file hosts di direktori /etc/ dan di file ansible hosts, maka masih belum ada yang match.
Edit file /etc/hosts dan tambahkan host selain R1
192.168.122.100 R1
192.168.122.101 R2
192.168.122.103 S1
192.168.122.104 S2
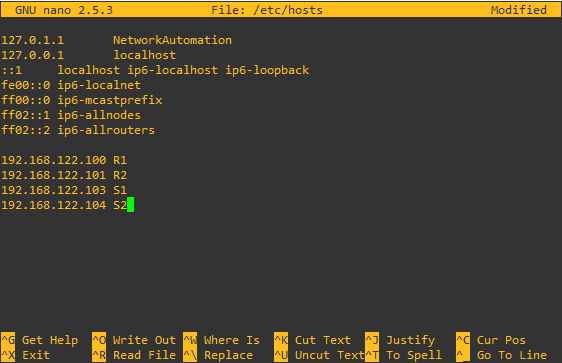
Create host file on root directory
Sekarang kita akan buat host file yang akan digunakan untuk inventory device apa saja yang akan dimanage oleh Ansible. File ini berbeda dengan file hosts di direktori etc yang digunakan untuk mapping ip address dan device name (fungsi DNS).
root@NetworkAutomation:~# nano hosts

Cek apakah file sudah berhasil di-create
root@NetworkAutomation:~# ls
hosts
root@NetworkAutomation:~# cat hosts
[gns3-ios]
R1
R2
S1
S2
root@NetworkAutomation:~#
Create ansible configuration file at root directory
Buat configuration file di direktori root dengan nano lalu isi sebagai berikut:
[defaults]
hostfile = ./hosts
host_key_checking = false
timeout = 5
Dalam lab ini, value dari parameter host_key_checking bernilai false, saat production untuk alasan security best practicenya adalah diset true.
File tempat host yang digunakan adalah file hosts di root directory –> ./hosts
Timeout ssh = 5 menit.
Check host yang dikonfigurasi:
root@NetworkAutomation:~# ansible --list-host all
  hosts (4):
    R1
    R2
    S1
    S2
root@NetworkAutomation:~#
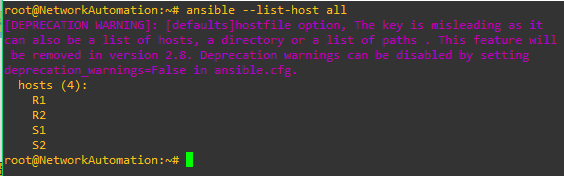
Sampai tahap ini, initial setup sudah selesai.
cara setup ansible pada gns3 gimana mas?